The first step in creating any image is conceiving the idea, then finding great sources to work with to do that idea justice.
Having thought of combining Alice in Wonderland with the Zombie movie Zombieland, I first searched for a good image of actress Mia Wasikowska and a whole bunch of bloody gore pics and textures I could use to suitably zombify her!
Because the image of Mia was a bit "washed out" I wanted to work on the contrasts and shadows to make the final image more "dramatic". This I did using the Brightness/Contrast tool. Brightness DOWN, Contrast UP until it pleases the eye!
Next I wanted to give her skin tone a more "sickly" feel, so I selected the skin areas with the Polygonal Lasso Tool and Cut & Pasted it onto a new Layer (some people prefer to use masks for specific areas, I prefer to cut to a new layer). I also at this point had the idea of chopping her arm off, so removed that from the image. Once I had my "skin" layer, I used the Hue/Saturation Tool to make the skin appear more grey/green and lifeless.
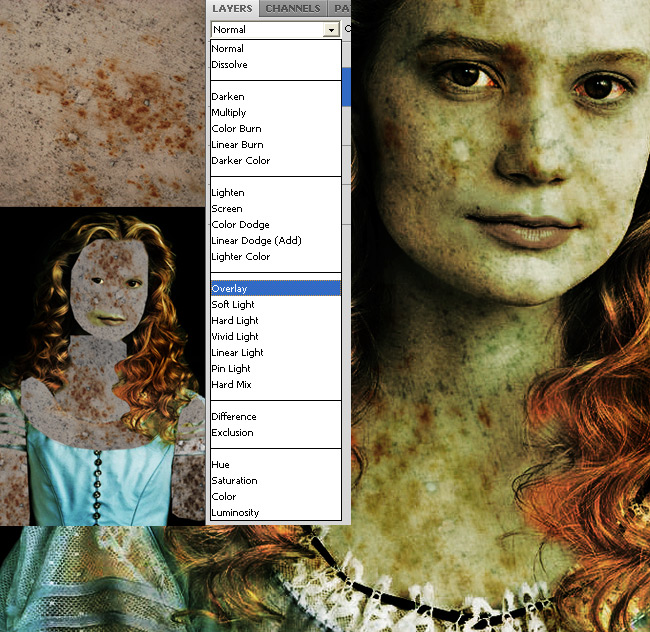
For the final touches on the skintone I wanted to give her a corpse-like effect with blotches and decomposition etc. I sourced an image with great textures, positioned it over the skin layer areas, then blended it in using the OVERLAY Tool. There are so many great tools on the Layers Tab for blending layers together and they tend to work differently on different images, so experiment with all of them until you find the one that works best for the desired effect.
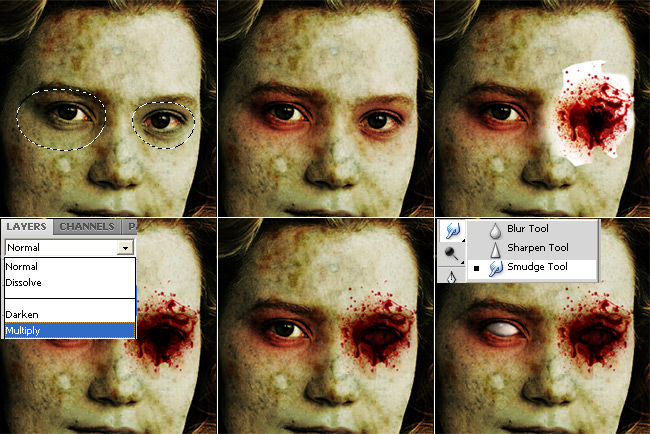
For the eyes, first step was to highlight the area around them - I selected the area I wanted with the Lasso Tool and used a Feather radius of 20px to create a gradual fade(Select > Modify > Feather), then used the Hue/Saturation Tool to make the skin redder than the rest of the face so they would stand out. I then used a combination of two or three blood sources to create the ripped-out eye socket...this was then blended onto the skin using the Multiply Tool on the Layers Tab. Lastly I painted out the other eye using the Smudge Tool and tweaked it with Brightness/Contrast Tool.
The mouth came together pretty quickly thanks to finding the right source images. This was created using two Halloween masks. The first I placed and it fitted almost perfectly on Mia's chin, saving me a lot of time. Once again the Multiply Tool was used to blend onto the face. The teeth and flesh was cut from the other mask...I had to move the bottom row of teeth up to fit the shape of Mia's mouth. After that I just used the Brightness/Contrast Tool until it fitted in nicely with the contrast of the face.
By now you have seen most of the tricks used for creating the bloody gore effects I used. The same principals in previous steps were used for the arms: Place the bits in the right place, trim away excess image areas, blend onto the body.
There are so many awesome tools available under the IMAGE > ADJUSTMENTS Tab...Brightness/Contrast, Hue/Saturation, Shadow/Highlights etc...it's really a matter of playing and tweaking for hours until you are satisfied with the results.
A few more steps in the process:
Since the image just wasn't busy enough (insert sarcastic laughter here) I decided to add in some of the Alice in Wonderland characters to finish off the image.
First, the mouse: I dropped her in on Mia's shoulder and cut the background out. The fact that she is carrying an eye-ball around added to the humour for me since "Alice" had one of her eye-balls missing!
After adding the blood, zombie eyes and teeth, I felt the blood was getting lost on her pink dress, so I tweaked it to a blue hue to better show the gore!
Final touch was the shadow to make her placement on her shoulder more realistic.
The White Rabbit.
To create the "fur" on both the mouse and the rabbit, I did the following:
Cut the animals out, tweak the lighting and contrast, and place them in the correct position.
Select the Smudge Tool, set the brush Master Diameter to 1px and Strength to 80%.
I then literally "painted" each and every hair by placing the pointer onto a position on the animal and smudging from the edge of the animal away into the open area of the layer it is on.
For the lines that appear to be too hard on the ends, I set the Eliptical Marquee Tool with a Feather (soft edge) of 20px...this helps to create the effect of the hairs tapering at the ends
The finished image...
Photoshop tutorial by davidowens originally posted on Worth1000.
Looking for more Zombie tutorials, try this one or visit blog.designcrowd.com/tag/tutorial for more helpful hints and tips to boost your designer skills
 Looking to earn from your graphic design skills?
Check out the design jobs board and start earning today!
Written by DesignCrowd on Thursday, March 30, 2017
DesignCrowd is an online marketplace providing logo, website, print and graphic design services by providing access to freelance graphic designers and design studios around the world.
