In this tutorial, I will be going through the basic steps I used to create these two winning entries.
As you can see, what works for clowns also works for mimes. The only difference is that if you're working on a mime entry, you're not allowed to talk. You can click on any of the images in this tutorial to get a larger view. I used Photoshop on a Mac OSX platform.
Sorry to disappoint if you thought I was going to do a step-by-step on either of these images but since I work a bit destructively (although I'm getting better at not doing this) and to make it more fun for me, I'm going to create a brand new image which you can see each step of the way.
I'm going to use that dorky but lovable actor Michael Cera as our subject. I'm also going to do him as a normal happy clown. If you want an evil clown, you're free to add blood, fangs, and scars at your discretion.
The first couple of steps I'm going to gloss over really quickly as they're pretty basic, cosmetic things.
I created a new layer and put a stripey circus pattern on it. Then I created a layer above it, filled it with dark blue and set it to multiply. I added a layer mask to this layer and masked out the center of it to create a vignette. Then I copied the background layer of Michael (we're on a first-name basis now) and moved it to the top and then masked out the gray background so I could see what I added underneath.
Ok, on to the makeup. I create a new layer above Michael which I'll name "white paint" and on that layer I'll do just that. I grab a brush at 100% hardness and of an appropriate size and at 100% opacity, paint it over his face leaving the eyes unpainted.
Next, we want to change this layers blending mode to "Color". In doing so, we've essentially desaturated the image. When first trying to figure out how to create clown makeup, I searched the web for tutorials and found one that took me up to this point...and stopped. I've seen many people do this-gray faced clowns. That just doesn't do it for me. If you've ever had the chance to wear face paint (sometimes called grease paint with good reason) not only is it bright white, it's thick and greasy-covers pores and wrinkles. By just desaturating the image, you're just removing color and to me at least, it does not give the appearance of makeup.
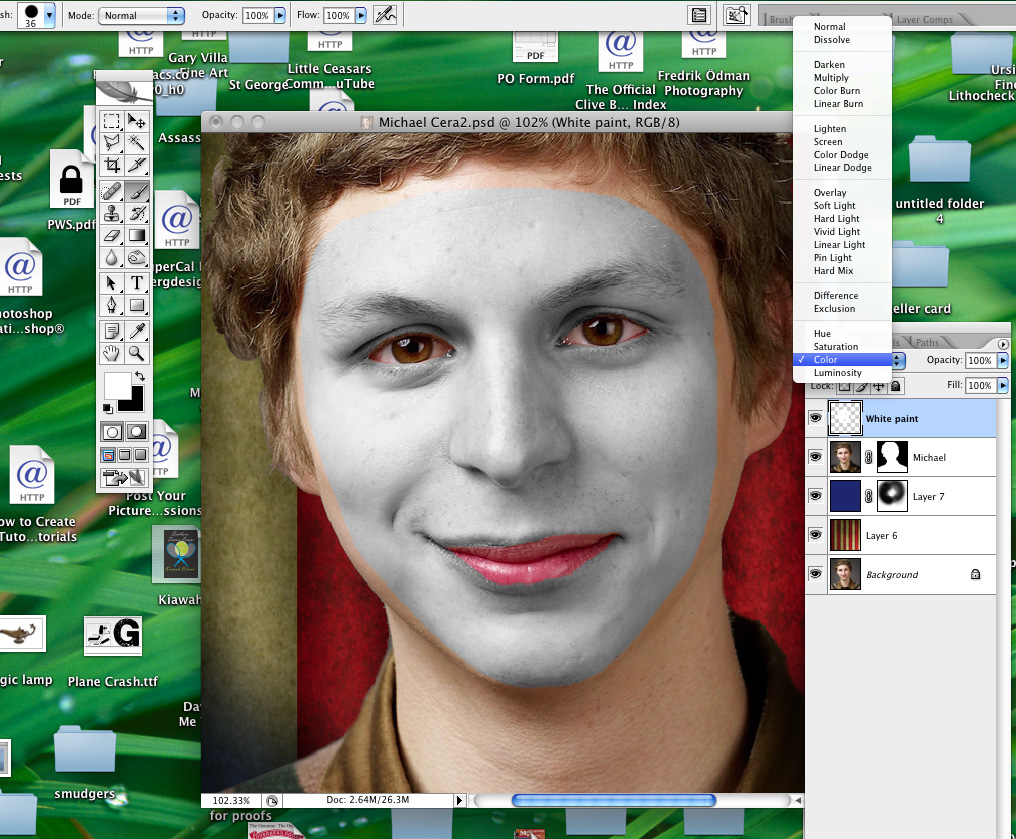
So how do we get that nice white base? I stumbled around a bit and came upon this: duplicate the white paint layer and then change its blending mode to overlay. You can then lower the opacity a bit to an amount that looks good (here I've gone down to 74%) and if some of your shadows have gotten a bit blown out, you can add a layer mask and with a soft round brush at 20% opacity, you can mask a few of those areas until your shadows come back.
Alternately such as on my mime entry, I set the layers blending mode to Soft Light instead of Overlay - try them both and see which one works best in your particular situation.
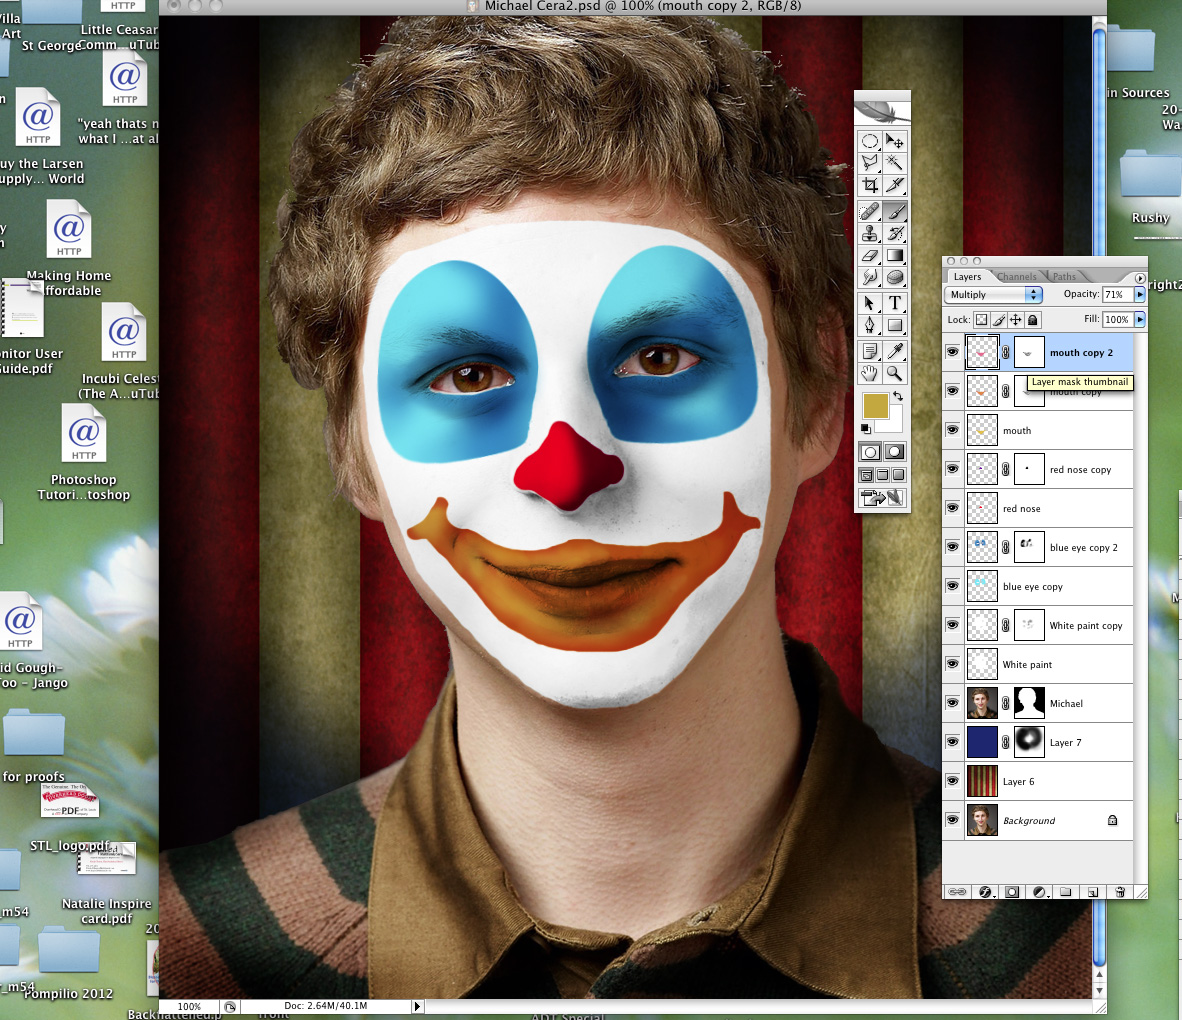
Ok, now on to the eyes. I've created another layer, "blue eye" which I set to Multiply and using the elliptical marquee tool created and filled an ellipse with a light blue color. I then warped it into the shape I wanted. I think it's important for realism to not create shapes too perfect or symmetrical because it doesn't work that way in real life.
I then duplicated this layer, flipped it horizontally (Edit-transform-flip horizontal) and positioned it over the other eye. I warped it again a little bit so that it would not be identical to the other side then I merged the two blue eyes layers (you'll have to set it's blending mode back to multiply) and then erased the blue color where it went over his eyeballs.
Again, a lot of people leave it here. It doesn't look bad but the color seems a bit too even and unnatural. To change that, duplicate the blue eye layer and then go to image-adjust-brightness/contrast and lower the brightness of this layer.
Now add a layer mask to this second blue layer and mask out some of this darker color (which is also set to multiply) allowing the lighter blue to show through in places. Don't do this at random, figure out where your light is coming from (in this case, from the left) and mask accordingly. Additionally, I've also used the burn tool (midtones) to darken some areas (to the right of his nose for example) in keeping with the overall lighting.
We'll do the same thing for the nose with a slight variation. Create a new layer set to multiply-and paint in the red shape. I duplicate that layer and mask out where I want highlights and this time instead of going to brightness/contrast, I'm going to image-adjust-hue/saturation and adjusting the hue slider until the red turns purple.
In the second part of the image you can see the result of that (I've hidden the lower red nose layer). In the third part of the image, you can see the result where I've turned the lower layer back on.
You now what? I like that so much that I'm going to go back to my Blue eye copy 2 layer and adjust the hue a bit there as well.
On to the mouth. Again, it's the same steps: new layer, set to multiply and paint on your color.
My original intent was to paint the mouth with a dark purple which would have colored the lips quite well. I changed my mind but the mustard color I chose isn't really doing the job very well. No bother. I just jump back down to the White Paint layer, choose white and begin painting over the missed spots on the lips.
I also did it on the White paint copy layer but I lowered the opacity of my brush down to 30% so I could keep more of the detail in the lips.
Like the eyes and the nose before, I duplicated the yellow color layer but this time I did it twice and changed the hue on each of these layers and masked each accordingly. You can use as many layers as you want-just don't go too crazy.
Now that we have our colors done, I'd like to outline some of them - not necessary to do, it's just the style of makeup I want to create. In preparation for this, create a new layer named Black Outlines. With this layer active, command+click in the layer thumbnail of the Blue Eyes layer-this will select all pixels in that layer. (I know a lot of you use Windows and I never remember the Windows equivalent but it's either Control+click or Alt+click: you'll figure it out, I have confidence in you). Notice that the selected area does not include the eyes themselves and if I were to add a stroke, it would do the outside edge of the blue but also the inside edge around the eyes - not what I want so I grab the elliptical marquee tool and by holding down the shift key and dragging the marquee over each eye one by one, I add them to my selection.
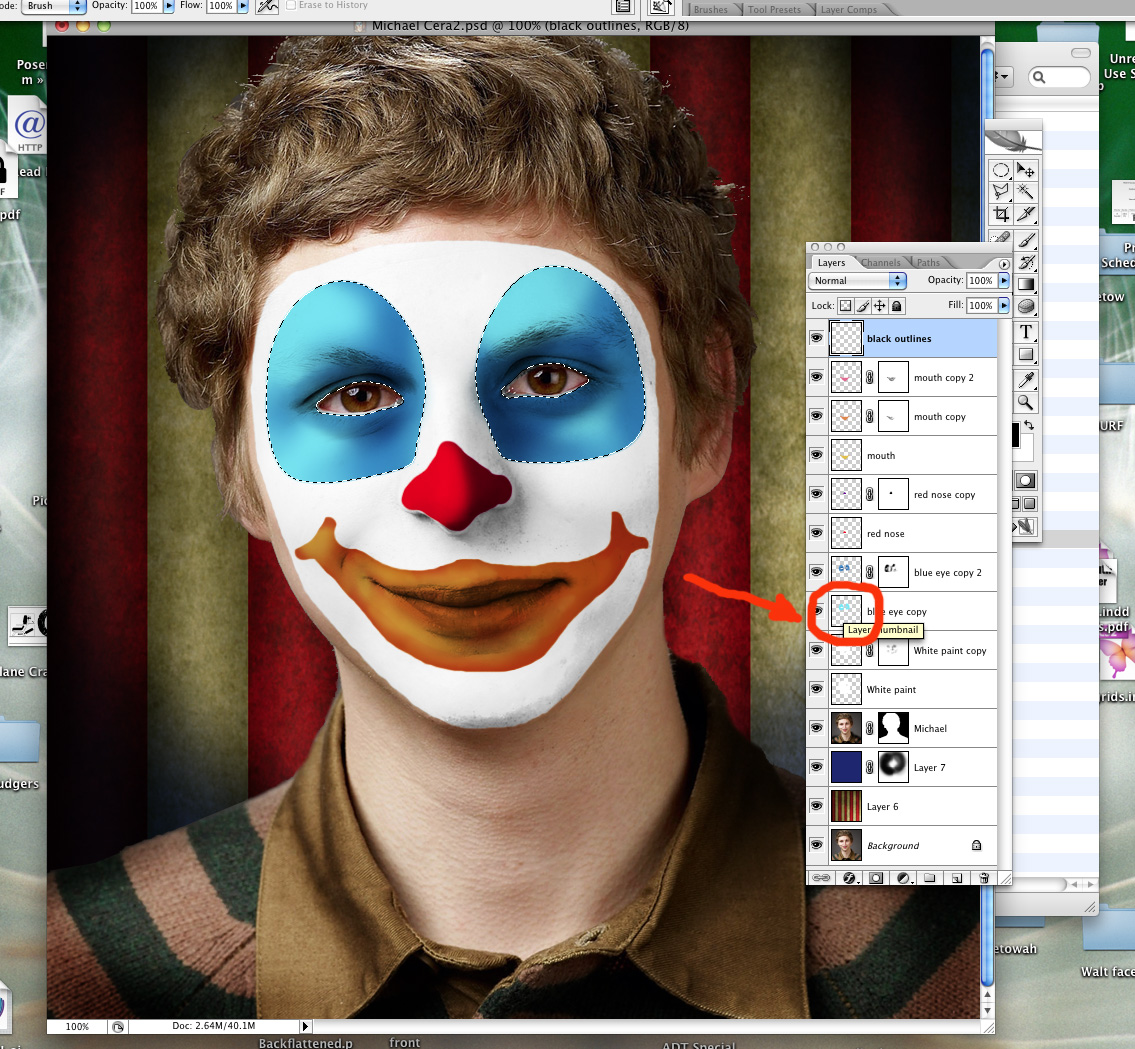
So now let's go ahead and outline the eye makeup in black. Got to Edit-Stroke and then another window will pop up. Set the stoke to 6 pixels (or whatever you deem appropriate), the color to black and the stroke to outside.
I've done the same for the nose and have kept all the outlines together on one layer. I've changed the blending mode to Multiply.
I've first smudged the strokes just a bit with a soft brush at 50% strength so that they don't look too perfect and Photoshopped (but don't overdo it) and then with the dodge tool set to Shadows and 50% exposure, dodge where the light would be hitting it hardest. Even though it's black, the makeup is shiny and will reflect light.
Instead of outlining the mouth in black, I've decided to outline it in red. I've created a new layer and followed the same procedures (once you have the basic idea, it's just repetition). This time, however, I've smudged the red outline quite a bit more into the underlying color. I've also used that same red color to go over the lips a bit more.
I've been saying all along how shiny this makeup is so it's time to add a highlight layer. On it, I've used a soft brush at 80% opacity and using the color white painted in some highlights as shown by my precisely drawn green arrows.
Yes, I know those highlights look lame but bear with me, I'm trying something new. I want to add a little skin texture to these highlights so I go to Filter-Texture-Texturizer and in the pop up choose the sandstone texture with settings as shown.
So how did it work? Well, it applied texture but also dark shadows in the texture. So I changed the blend mode to screen which dropped out the shadows and was left with just the white grainy looking highlights. They were a bit too intense so I grabbed the blur tool and setting it to a soft brush and 50% opacity, I softened it up a bit. I also used a soft eraser at 20% opacity and erased a little of the highlights.
I moved on to the lips, alternately painting on white at varying opacities and then smoothing them out with the blur tool.
Almost done. White is very reflective and tends to pick up other colors that are near it. There is no real strong colored light in this image but even so, it will add dimension if I show a bit of that. I create a new layer set to multiply and using a light blue color, I use a soft brush set to 20% opacity and paint a little blue over the right side of his face. If you look closely at the clown I did at the beginning of the tutorial, I did just this in two layers - the left/shadow side of her face has a light purple multiplied over it while the right/highlight side has a green color. It's so much nicer than just stark white. The mime has just a touch of red over her face.
And we're done, voila!
Wait a minute! Where did that hair come from? Well this was supposed to be a makeup tutorial and if that was what you were here for, you're welcome to leave. If you're curious as to how I painted in this hair and it only took about 10 minutes, you're welcome to stay.
Ok-about the hair. I've never tried this before but heard some suggestions from another artist which I then modified to my liking. I created a custom brush which is shown on the left and then I changed my brush presets to the settings as shown - I'm using a Wacom tablet but a mouse would be pretty easy as well-just change the Pen Pressure settings to off.
I painted the hair in three layers. The first was in red and I covered all his existing hair. The second layer was set to Multiply and using a brown color at varying opacities, I gave it some shading. The top layer was set to normal and I changed the color to orange. I adjusted the contrast and hue a little on each layer and then using a soft round brush, burned highlights at 20% to increase the shading a bit.
Hope you found this tut helpful. Now quit Clowning Around and start creating some art.
Photoshop tutorial by Todd1000 originally posted on Worth1000.
Looking for more tutorials, try this one or visit blog.designcrowd.com/tag/tutorial for more helpful hints and tips to boost your designer skills
 Looking to earn from your graphic design skills?
Check out the design jobs board and start earning today!
Need a clown logo design? See our new Clown Logo Design Maker.
Written by DesignCrowd on Thursday, March 2, 2017
DesignCrowd is an online marketplace providing logo, website, print and graphic design services by providing access to freelance graphic designers and design studios around the world.
